Showing posts with label Blogger. Show all posts

Wednesday, March 24, 2010

0 How To Change The Date Or Time Of Your Recent Post In Blogger

The date and time settings for a post are beneath the post-editing field, just click the "Post Options" link:


This will reveal some more settings for your post, including the date and time, which are on the right-hand side.
Once you've selected a new date and time, be sure to publish your post.
Read More..

Tuesday, December 22, 2009

0 Add A Related Post Widget In Blogger Part 2

In the last post we have discussed how to add a related post widget in blogger using the original template and does not use the read more widget.
In this post we are going to add a related post widget in blogger using a template that has been modified with Read More widget.

Here it goes. Follow the simple step and you are ready to go.


  • Log in into blogger with your ID
  • Click Layout 


  • Click EDIT HTML tab 


  • Click Download Full template. Please back up your template first
  • Please download the script first
  • Give a mark next to Expand Widget Templates and wait for a few seconds until the process is over.


  • Find the code below (The one in red code):


  • Copy the script you have downloaded, then paste you see below :  


  • Click SAVE TEMPLATE
  • And you are done. 
Read More..

2 Add A Related Post Widget In Blogger Part 1

It is a simple method to make the visitors stay long on your site.Which is to add the related posts widget at the end of every post in your blog. This increases the number of page views and it may even increase the page rank of your blog some day.

    Here it goes by following these simple steps.


    • Log in into blogger with your ID  
    • Click Layout 

    • Click EDIT HTML tab 


    • Click Download Full template. Please back up your template first 
    • Please download the script first
    • Give a mark next to Expand Widget Templates and wait for a few seconds until the process is over. 

    • Find the code below (The one in red code): 


    • Copy and paste the script you have downloaded right under the code
    • Click SAVE TEMPLATE
    • Finish and check the result
    The above steps are for those who use the original template and does not use the read more widget. If you use a template that has been modified with Read More. Use this link.


    Read More..

    Sunday, December 20, 2009

    0 How To Install Blogger XML Templates

    In this post I am going to tell you how to install a new blogger template from your PC which you have downloaded from the internet to your PC.


    First, log into your Blogger blog. 

    STEP :1 Click the tab entitled “Layout”.


    STEP : 2  Click on “edit html”. You will be brought to the screen code of your blog where you can edit your templates.


    Your blog file is saved in XML code that makes it easy for you to just upload instead of trying to copy and paste an entire page of code like you would with HTML.

    STEP : 3 Click the browse button.


    STEP : 4 Choose the template you downloaded from where you saved it. Open the file. Click on your template with the XML extension. 


    Your file will appear in the browser bar. You may now click “upload”. 


    You may see a warning appear in red telling you that certain widgets like your profile or link list will be copied over. This will happen, but you can always add them back.


    Now, you may view the look of your new blog. To add gadgets, simply go back to the layout tab, click page elements, drop and drag these elements as you wish.

    Read More..

    Monday, June 8, 2009

    0 Submit Blogger Sitemap To Yahoo To Index Your Web Pages

    This post explains how to submit your blogger site-map to Yahoo.By submitting your site-map to yahoo, they will index your web pages in yahoo search engine and provide you with detailed information related to your blog like which pages are linking to yours,popular pages in your site and you can submit and track feeds for your sites.
    Also,you have the choice to delete any URL of your blog if you won't want to index certain pages of your site.
    Submitting your site to yahoo is easy and give your web pages more exposure.
    All you need is a YAHOO ACCOUNT(ID).However,you don't need an yahoo ID to know the information like how many pages are indexed,etc.But,if your blog is a new one or no pages in your blog are indexed(type your blog URL in yahoo search and see to check whether your web pages are indexed or not), then you want Yahoo id to submit your sites,feeds,etc.
    Let's see how to make yahoo index your web pages by submitting your blog site-map.
    1.Go to Yahoo Site Explorer


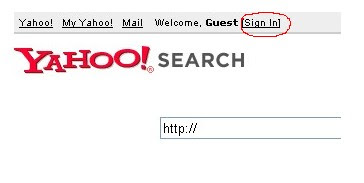
    2.Click on the 'Sign in' link which is at the top of the page,see the screen shot below(If you don't have a Yahoo id, you can get one here) and sign into your account.


    click on the 'sign in link'
    3.Type your blog url in the box provided as shown in the below screen shot.Don't forget to replace the 'yourblogurl' with the original url of your blog and click on the 'Add My Site'

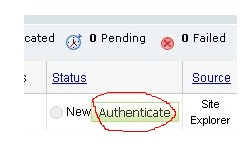
    4.After adding your site,you need to Authenticate(Verify your ownership).
    There are two ways to verify your ownership.One is to upload a file to the root directory of your site which can't be possible in blogger.

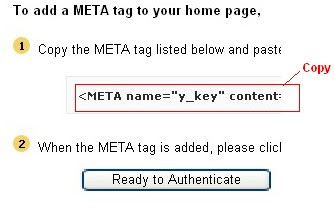
    Another one is to 'adding a metatag' which is possible and the only way to verify ownership for bloggers.First,copy the metatag..
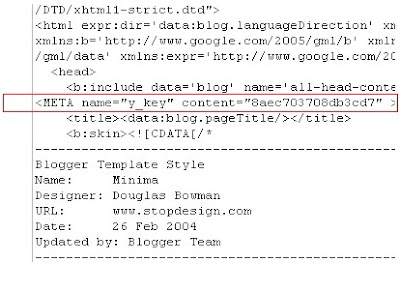
    Next,sign in to your blogger account>Edit html and paste the metatag below the head tag and SAVE THE CHANGES,look at the screenshot below.

    Next,you will get a message saying that 'Your site is pending authentication'
    Note:Don't remove the meta-tag,they will re-validate your ownership by checking your ownership regularly.
    5.Next,go back to the 'Site explorer home', and check the box next to your blog url and click on the Manage button.


    6.Type rss.xml or atom.xml in the box provided.It helps yahoo to discover more of your site content via your rss or atom feeds and to index your blog pages quickly whenever your blog is updated.Next,click on the add feed button.


    That's it.Now,you have successfully submitted your blog site-map to yahoo.Check your account after a couple of days and you will see your blog indexed in yahoo search engine.


    Read More..

    2 Top 5 Ways to get Free One Way Backlinks to your site

    One way backlinks are very critical to any website success. The more one way backlinks pointing to your site, the more your Google Pagerank and the more amount of traffic you will get. This should also increase your sales,etc.
    But the thing is.. getting the right and quality one way backlinks from high pagerank sites is not an easy task, and in this article, we'll find out some of the best ways to get free one way backlinks:

    1. Try to write as much quality content as you can... that will encourage the readers to link to your site. The more useful, informative content you post, the more likely people are to link it. But, this method can take a while to really pay off because like all the new websites, you don't get much traffic.

    2. Write quality articles and submit them to top article directories like ezinearticles and goarticles. The advantage in this is, you'll not only get a backlink from high pagerank directories, but also you'll find that your articles are used on other people's sites with a backlink to your site.

    3. Participate in forums,discussion boards that are related to your website's niche and add a link to your site in the signature. Make sure that you write quality posts, don't spam. This will also help you get some decent traffic to your site.

    4. There is absolutely nothing wrong to get a backlink from a related blog post you decide to comment on. This is one of the effective way of one way link building especially if you comment often on blogs. Comment on blogs related to your niche with a link back to your site as your signature.. and Again, make sure you never spam.

    5. Submit your site link to major, well known web directories. Getting listed in directories related to your site not only bring you tons of targetted traffic, but will also improve your search engine rankings. Some of the popular directories to get listed in are DMOZ directory and Yahoo directory. You can submit your link to both paid and free directories and they worth your time.
    Read More..

    0 Hide-Disable-Remove-Blogger Navbar From Your Blog

    Learn how to hide,disable or remove the blogger navbar(navigation bar) from your blog.
    First,let us see what blogger navbar is:


    blogger navbar

    Blogger navbar allows users to easily navigate to other random blogs and it also has a feauture to search the blogs ,and mark any blog as spam.
    So,now you have a clear idea of what really a blogger navbar is.So, why so many people prefer to just remove the navbar inspite of the feautures it has like search,etc.Many people think that, it spoils the look of the blog,especially if your blog has differnet subtitle layout which looks too obvious to see for a visitor.Well, let me come to the actual point on how to disable or hide your blogger navbar.

    Below is the step-by-step procedure on how to do it with photos to make it easy to understand.

    1.Sign in to your blogger account and click the layout button next to your blog name

    click the layout button

    2.Next,click the edit html tab as shown in the below picture.


    edit html

    3.Add the below html code as specified in the below picture.
    #navbar {
    height: 0px;
    visibility: hidden;
    display: none;
    }


    add the code like this

    4. Save the changes.

    Now, you can see your blog without that navbar(this tip can only hides the navbar,it doesn't completely delete it).If you want the navbar to appear again,just remove that code and save the changes.
    If you have any doubts,regarding this post,don't hesitate to ask.You can ask your doubts via comments to this post.
    Read More..

    0 How to disable right click in blogger (blogspot) or any webpage

    This post explains how to disable right click on blogger(blogspot) or any other webpage using a html(javascript) code.
    It is so annoying if someone copies(thefts) your blog posts,articles,images and another kind of information owned by you saying that they are the original owners of the content.
    But,I think 'disabling right click' is not the right solution for that.
    Most people come to your site to read information and very small percentage of people come to your site to steal your work,images,etc.So,most people feel it insulting and I think it's very unprofessional thing to do

    If you want to protect your images,my suggestion is to add a Watermark(logo) of your sitename,or your name on the images,pictures,etc.
    Note:Using this javascript code,you only disable the right click by warning the visitors that the content is copyrighted.

    That's all my personal opinion,However if you despirately want to add this feauture,You can get this code here.


    Where to paste it in blogger ?
    Sign in to your blogger dashboad>layout>Add a Pageelement>html/javascript(look at the screenshot below)
    and paste the below javascript code and Save the changes.


    How it works?
    If you right click on the webpage,a message will pop up on screen saying "function disabled".If you want to change the message to you own one like "sorry....the work is copyrighted" or something like that,replace the "funtion disabled" text with your own message in the Javascript code.
    Read More..

    Saturday, June 6, 2009

    0 Submit Your Blogger/FeedBurner Sitemap to Google Webmaster Tools


    Submitting a Sitemap to Google Webmaster Tools provides Google about your site and posts. However I recently found the article "How do I create a Sitemap file?" from Google Webmaster Help Center that You don't need to submit your Sitemap to Google Webmaster Tools if you use a Blogger.


    Blogger automatically submits a Sitemap for you


    Even though the article says so, I decided to submit my Sitemap to Google becasue I am not 100% sure how it works and it does not cost or hurt me even if I submit it.


    Here's how!


    1. If you do not have Google Webmaster Tools account, you can register by visiting Google Webmaster Tools.


    Google Webmaster Tools


    2. If you do not use a redirected custom feed such as FeedBurner, type "atom.xml" and click "Add General Web Sitemap" button.


    Add Sitemap


    3. If you do use a redirected custome feed such as FeedBurner, type "atom.xml?redirect=false".


    Otherwise you will see "URL not allowed" error because the sitemap you have submitted to Google Webmaster Tools is actually redirecting to the FeedBurner feed URL not your site URL. And your Sitemap contains a URL that is not allowed based on the Sitemap's location.


    Sitemap with errors and Sitemap without errors


    Read More..

    Monday, May 25, 2009

    0 Privacy Policy for www.techtipntrick.blogspot.com/

    Privacy Policy for www.techtipntrick.blogspot.com/

    If you require any more information or have any questions about our privacy policy, please feel free to contact us by email at mansoor_mustafa@hotmail.com.

    At www.techtipntrick.blogspot.com/, the privacy of our visitors is of extreme importance to us. This privacy policy document outlines the types of personal information is received and collected by www.techtipntrick.blogspot.com/ and how it is used.

    Log Files
    Like many other Web sites, www.techtipntrick.blogspot.com/ makes use of log files. The information inside the log files includes internet protocol ( IP ) addresses, type of browser, Internet Service Provider ( ISP ), date/time stamp, referring/exit pages, and number of clicks to analyze trends, administer the site, track user’s movement around the site, and gather demographic information. IP addresses, and other such information are not linked to any information that is personally identifiable.

    Cookies and Web Beacons
    www.techtipntrick.blogspot.com/ does not use cookies.

    DoubleClick DART Cookie
    .:: Google, as a third party vendor, uses cookies to serve ads on www.techtipntrick.blogspot.com/.
    .:: Google's use of the DART cookie enables it to serve ads to users based on their visit to www.techtipntrick.blogspot.com/ and other sites on the Internet.
    .:: Users may opt out of the use of the DART cookie by visiting the Google ad and content network privacy policy at the following URL - http://www.google.com/privacy_ads.html

    Some of our advertising partners may use cookies and web beacons on our site. Our advertising partners include ....
    Google Adsense


    These third-party ad servers or ad networks use technology to the advertisements and links that appear on www.techtipntrick.blogspot.com/ send directly to your browsers. They automatically receive your IP address when this occurs. Other technologies ( such as cookies, JavaScript, or Web Beacons ) may also be used by the third-party ad networks to measure the effectiveness of their advertisements and / or to personalize the advertising content that you see.

    www.techtipntrick.blogspot.com/ has no access to or control over these cookies that are used by third-party advertisers.

    You should consult the respective privacy policies of these third-party ad servers for more detailed information on their practices as well as for instructions about how to opt-out of certain practices. www.techtipntrick.blogspot.com/'s privacy policy does not apply to, and we cannot control the activities of, such other advertisers or web sites.

    If you wish to disable cookies, you may do so through your individual browser options. More detailed information about cookie management with specific web browsers can be found at the browsers' respective websites.
    Read More..
    Related Posts with Thumbnails