Monday, August 3, 2009

0 How To Solve xvidcore.dll Not Found Error In Microsoft Windows Vista EnvironmentComing directly to the topic of this post, It’s on solving the error m

Coming directly to the topic of this post, It’s on solving the error message “xvidcore.dll not found” appearing on Microsoft Windows Vista PC. I am writing the solution to this problem as it occured on my Dell Vostro 400 PC loaded with Vista OS and I solved it. Thought of sharing as it may help you in saving some of your time.
Some particulars of this “xvidcore.dll” not found error:
The error “xvidcore.dll not found” was popping up when I was exploring a folder with video file/s (any format – .avi, .mpeg and .flv). When the video files were more, the error kept popping up again and again. Quite annoying as I had to click on OK multiple times to close these popups. I had no problem in playing any of these video files with video players.
xvidcore.dll not found error popup
Now, this xvidcore.dll error started popping up suddenly and it was not appearing from the day I started using my PC, i.e., more than one and half years back. I am still wondering why it started bothering me as I never installed anything relevant to xvid (Codec – Code/Decode Or Compressor/Decompressor for video files) on my PC. May be it was in built into some other application.

I searched for xvidcore.dll using the Windows Vista Search feature (including the search for hidden files) but as expected it couldn’t be found. The search window showing xvidcore.dll not found on my Vista PC is shown next:
xvidcore.dll not found in Windows Vista Search
I did a google search for the error “xvidcore.dll not found error” and found that I need to install Xvid codec from xvid.org. I downloaded Xvid-1.2.1 codec for Windows Vista from:
http://www.koepi.info/Xvid-1.2.1-04122008.exe
(Explanation to some of you who are wondering about the URL change from xvid.org to koepi.info. Clicking on “Xvid for Windows” hyperlink at the URL: http://www.xvid.org/Downloads.15.0.html leads to the URL – http://www.koepi.info/xvid.html with page having Download link for Xvid 1.2.1 codec).
I downloaded the xvid codec setup file and installed it choosing the Windows XP compatibility mode as shown below:
Setting Up XP Compatibility Mode For Xvid 1.2.1 Codec In Windows Vista Business
After successful installation of Xvid codec, I once again explored the folder with the video files and wow there was no popup of “xvidcore.dll not found” error. Oh! what a relief from the “xvidcore.dll not found” bugging popups. Well, I searched again for “xvidcore.dll” on my computer and found that the file was now happily there along with some other files relevant to xvid in the C:\Windows\System32 folder.
The screenshots shows the start of installation of xvid, its finish and location of xvidcore.dll file as found by Vista Search after xvid codec installation:
Installation start screen of Xvid codec
Xvid codec installation finish screen
Location of xvidcore.dll file in C:\Windows\System32 folder
Now, if you too are facing the error of “xvidcore.dll not found” (sorry for repeating it numerous times), then you can use the procedure in this post to save your time.


Let me know if I explained the steps well and did this post was of any use to you.
So bye to “xvidcore.dll not found” error message and welcome to your comments!
Read More..

0 How to be almost sure of not uploading or downloading virus infected files?

Computer viruses are designed to cause damage to your computer data. So you mustn’t be downloading files that are virus infected. In business or personal communication, it is very embarrassing if the receiver tells you that your files are virus infected.
Yes, I hear you saying that come on, I use an antivirus. How can the files be infected as I update my antivirus and scan all my files on computer regularly. I know almost all of the online and offline PC’s have antivirus protection on. Let me be very clear with you, even if you are using an antivirus, whatever it’s name be, there is no 100% guarantee that it will detect 100% viruses. Sad but true! If you believe that your antivirus is 100% completely taking care of known and unknown viruses, then it’s wrong!
While, you can use two antiviruses – one on your regular hard disk and one working from a bootable disk/CD/DVD etc. as and when required, there are still chances that you might be sending or downloading an infected file.
The solution is to use a scanner that has the power of detecting all the viruses. What if it combines more than 38 virus scan engines from different companies. Wouldn’t it be great! At least you would be almost sure that you are not going to send or have received an infected file.
Virustotal.com is an online site that lets you upload up to 10MB file for getting it scanned from 38 virus scan engines of different companies developing antiviruses. Yes it’s true, after uploading the file to be scanned, you get a report in few minutes depend on the traffic at the site) and thus you can be dead sure about a file infection or clean status. You can send the file from your browser interface or even by email.
The address of virustotal is:
Virus-scanning-of-the-file-at-virustotalVirustotal-scanning-result-for-a-clean-fileI got idea of writing this post after one of my friend (first) using Mcafee antivirus sent a file to another friend (second) who was using Symantec’s Norton antivirus and the second friend found the file infected.
My first friend’s Mcafee antivirus was updated and he had scanned the whole computer including the file to be sent. He hadn’t got any virus alerts in any of the files on his PC. It was the second friend’s antivirus that reported the file as infected. So, I advised my first friend to scan the files being sent or being downloaded, from now onwards through – virustotal.com.
While there are numerous advantages of virustotal – Scanning power of 38 virus scanning engines, free, online availability at any hour and simple usage etc., it has certain limitations also, these are:
- It requires an Internet connection to upload the file and get it scanned for viruses.
- It can only scan 10 MB of a single file and not files above 10 MB.
- There is no guarantee that a file detected as clean by 38 virus scanners is not infected.
- It only detects viruses and doesn’t clean.
- Sometimes there can be delay in uploading the file and getting the results, depending on the traffic.
According to me, virustotal.com is a free and highly useful site that can save you from embarrassment of sending an infected file or using one that causes damage yours highly useful data. It doesn’t take too long to get the results (few minutes most of the times) and the chances of file being infected after it has been declared to be clean by 38 virus scanners is almost nil. What do you say?
So, next time you are sending or receiving a file to/from a known or unknown person, don’t forget to scan it through virustotal.com
Do you know of an offline virus scanner that combines power of 38 virus scanners? Yes, then let me know so that I can scan all my computer files not from a single virus scanner but from 38 virus scanners.
Waiting for your open comments and views.
Read More..

0 How To Disable Dr. Watson Error

To disable Dr. Watson

1. Click Start, click Run, type regedit.exe in the Open box, and then click OK.
2. Locate and click the following registry key:
HKEY_LOCAL_MACHINE\Software\Microsoft\Windows NT\CurrentVersion\AeDebug
NOTE: Steps three and four are optional, but they necessary if you want to restore the default use of Dr. Watson.
3. Click the AeDebug key, and then click Export Registry File on the Registry menu.
4. Enter a name and location for the saved registry file, and then click Save.
5. Delete the AeDebug key.

Registry entries for debugger programs are located in the AeDebug key in Windows. The Dr. Watson program is installed by default in Windows, and is configured to run when an application error occurs (with a data value of 1 for the Auto value). The default values are:
Value Name = Auto
Type = String (REG_SZ)
Data Value = 1 or 0. (Default is 1)
Value Name = Debugger
Type = String (REG_SZ)
Data Value = drwtsn32 -p %ld -e %ld -g

NOTE: This data value (drwtsn32 -p %ld -e %ld -g) is specific to Dr. Watson. Alternative debuggers will have their own values and parameters.
Read More..

Friday, July 31, 2009

0 Windwos 8 Concept Video

Windwos 8 is the next generation Operating system by Microsoft to give the PC users ultimate computer experience.Although Windows 7 isn’t released until 22nd October 2009, attention is already turning to it’s replacement Windows 8 which will is expected in 2011/12Microsoft has changed its approach to naming operating systems (e.g XP, Vista) and is using an internal numbering system and the next Windows operating system, Windows 7, is the 7th release. Hence the replacement for Windows 7 is expected to be called Windows 8.
Here is one exclusive video of windows 8.This is not actual video of the OS.This is a concept video.But i am sure you can love it.
Read More..

Monday, June 8, 2009

0 Submit Blogger Sitemap To Yahoo To Index Your Web Pages

This post explains how to submit your blogger site-map to Yahoo.By submitting your site-map to yahoo, they will index your web pages in yahoo search engine and provide you with detailed information related to your blog like which pages are linking to yours,popular pages in your site and you can submit and track feeds for your sites.
Also,you have the choice to delete any URL of your blog if you won't want to index certain pages of your site.
Submitting your site to yahoo is easy and give your web pages more exposure.
All you need is a YAHOO ACCOUNT(ID).However,you don't need an yahoo ID to know the information like how many pages are indexed,etc.But,if your blog is a new one or no pages in your blog are indexed(type your blog URL in yahoo search and see to check whether your web pages are indexed or not), then you want Yahoo id to submit your sites,feeds,etc.
Let's see how to make yahoo index your web pages by submitting your blog site-map.
1.Go to Yahoo Site Explorer


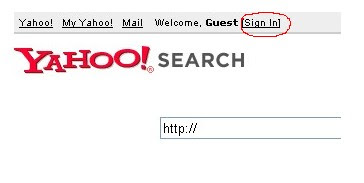
2.Click on the 'Sign in' link which is at the top of the page,see the screen shot below(If you don't have a Yahoo id, you can get one here) and sign into your account.


click on the 'sign in link'
3.Type your blog url in the box provided as shown in the below screen shot.Don't forget to replace the 'yourblogurl' with the original url of your blog and click on the 'Add My Site'

4.After adding your site,you need to Authenticate(Verify your ownership).
There are two ways to verify your ownership.One is to upload a file to the root directory of your site which can't be possible in blogger.

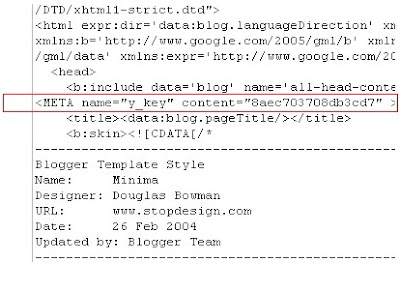
Another one is to 'adding a metatag' which is possible and the only way to verify ownership for bloggers.First,copy the metatag..
Next,sign in to your blogger account>Edit html and paste the metatag below the head tag and SAVE THE CHANGES,look at the screenshot below.

Next,you will get a message saying that 'Your site is pending authentication'
Note:Don't remove the meta-tag,they will re-validate your ownership by checking your ownership regularly.
5.Next,go back to the 'Site explorer home', and check the box next to your blog url and click on the Manage button.


6.Type rss.xml or atom.xml in the box provided.It helps yahoo to discover more of your site content via your rss or atom feeds and to index your blog pages quickly whenever your blog is updated.Next,click on the add feed button.


That's it.Now,you have successfully submitted your blog site-map to yahoo.Check your account after a couple of days and you will see your blog indexed in yahoo search engine.


Read More..
Related Posts with Thumbnails