Monday, June 8, 2009

0 Submit Blogger Sitemap To Yahoo To Index Your Web Pages

This post explains how to submit your blogger site-map to Yahoo.By submitting your site-map to yahoo, they will index your web pages in yahoo search engine and provide you with detailed information related to your blog like which pages are linking to yours,popular pages in your site and you can submit and track feeds for your sites.
Also,you have the choice to delete any URL of your blog if you won't want to index certain pages of your site.
Submitting your site to yahoo is easy and give your web pages more exposure.
All you need is a YAHOO ACCOUNT(ID).However,you don't need an yahoo ID to know the information like how many pages are indexed,etc.But,if your blog is a new one or no pages in your blog are indexed(type your blog URL in yahoo search and see to check whether your web pages are indexed or not), then you want Yahoo id to submit your sites,feeds,etc.
Let's see how to make yahoo index your web pages by submitting your blog site-map.
1.Go to Yahoo Site Explorer


2.Click on the 'Sign in' link which is at the top of the page,see the screen shot below(If you don't have a Yahoo id, you can get one here) and sign into your account.
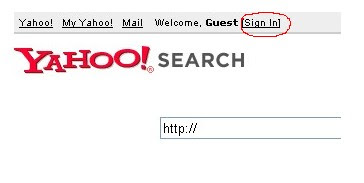

click on the 'sign in link'
3.Type your blog url in the box provided as shown in the below screen shot.Don't forget to replace the 'yourblogurl' with the original url of your blog and click on the 'Add My Site'

4.After adding your site,you need to Authenticate(Verify your ownership).
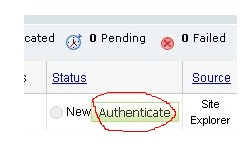
There are two ways to verify your ownership.One is to upload a file to the root directory of your site which can't be possible in blogger.

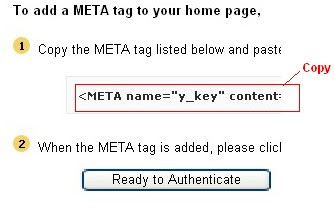
Another one is to 'adding a metatag' which is possible and the only way to verify ownership for bloggers.First,copy the metatag..
Next,sign in to your blogger account>Edit html and paste the metatag below the head tag and SAVE THE CHANGES,look at the screenshot below.
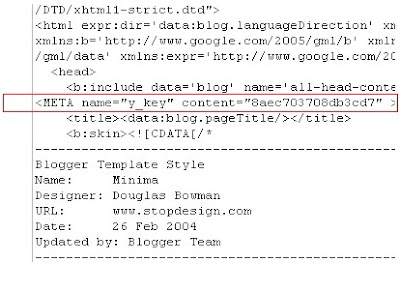
Next,you will get a message saying that 'Your site is pending authentication'
Note:Don't remove the meta-tag,they will re-validate your ownership by checking your ownership regularly.
5.Next,go back to the 'Site explorer home', and check the box next to your blog url and click on the Manage button.


6.Type rss.xml or atom.xml in the box provided.It helps yahoo to discover more of your site content via your rss or atom feeds and to index your blog pages quickly whenever your blog is updated.Next,click on the add feed button.


That's it.Now,you have successfully submitted your blog site-map to yahoo.Check your account after a couple of days and you will see your blog indexed in yahoo search engine.


Read More..

2 Top 5 Ways to get Free One Way Backlinks to your site

One way backlinks are very critical to any website success. The more one way backlinks pointing to your site, the more your Google Pagerank and the more amount of traffic you will get. This should also increase your sales,etc.
But the thing is.. getting the right and quality one way backlinks from high pagerank sites is not an easy task, and in this article, we'll find out some of the best ways to get free one way backlinks:

1. Try to write as much quality content as you can... that will encourage the readers to link to your site. The more useful, informative content you post, the more likely people are to link it. But, this method can take a while to really pay off because like all the new websites, you don't get much traffic.

2. Write quality articles and submit them to top article directories like ezinearticles and goarticles. The advantage in this is, you'll not only get a backlink from high pagerank directories, but also you'll find that your articles are used on other people's sites with a backlink to your site.

3. Participate in forums,discussion boards that are related to your website's niche and add a link to your site in the signature. Make sure that you write quality posts, don't spam. This will also help you get some decent traffic to your site.

4. There is absolutely nothing wrong to get a backlink from a related blog post you decide to comment on. This is one of the effective way of one way link building especially if you comment often on blogs. Comment on blogs related to your niche with a link back to your site as your signature.. and Again, make sure you never spam.

5. Submit your site link to major, well known web directories. Getting listed in directories related to your site not only bring you tons of targetted traffic, but will also improve your search engine rankings. Some of the popular directories to get listed in are DMOZ directory and Yahoo directory. You can submit your link to both paid and free directories and they worth your time.
Read More..

0 Hide-Disable-Remove-Blogger Navbar From Your Blog

Learn how to hide,disable or remove the blogger navbar(navigation bar) from your blog.
First,let us see what blogger navbar is:


blogger navbar

Blogger navbar allows users to easily navigate to other random blogs and it also has a feauture to search the blogs ,and mark any blog as spam.
So,now you have a clear idea of what really a blogger navbar is.So, why so many people prefer to just remove the navbar inspite of the feautures it has like search,etc.Many people think that, it spoils the look of the blog,especially if your blog has differnet subtitle layout which looks too obvious to see for a visitor.Well, let me come to the actual point on how to disable or hide your blogger navbar.

Below is the step-by-step procedure on how to do it with photos to make it easy to understand.

1.Sign in to your blogger account and click the layout button next to your blog name

click the layout button

2.Next,click the edit html tab as shown in the below picture.


edit html

3.Add the below html code as specified in the below picture.
#navbar {
height: 0px;
visibility: hidden;
display: none;
}


add the code like this

4. Save the changes.

Now, you can see your blog without that navbar(this tip can only hides the navbar,it doesn't completely delete it).If you want the navbar to appear again,just remove that code and save the changes.
If you have any doubts,regarding this post,don't hesitate to ask.You can ask your doubts via comments to this post.
Read More..

0 How to disable right click in blogger (blogspot) or any webpage

This post explains how to disable right click on blogger(blogspot) or any other webpage using a html(javascript) code.
It is so annoying if someone copies(thefts) your blog posts,articles,images and another kind of information owned by you saying that they are the original owners of the content.
But,I think 'disabling right click' is not the right solution for that.
Most people come to your site to read information and very small percentage of people come to your site to steal your work,images,etc.So,most people feel it insulting and I think it's very unprofessional thing to do

If you want to protect your images,my suggestion is to add a Watermark(logo) of your sitename,or your name on the images,pictures,etc.
Note:Using this javascript code,you only disable the right click by warning the visitors that the content is copyrighted.

That's all my personal opinion,However if you despirately want to add this feauture,You can get this code here.


Where to paste it in blogger ?
Sign in to your blogger dashboad>layout>Add a Pageelement>html/javascript(look at the screenshot below)
and paste the below javascript code and Save the changes.


How it works?
If you right click on the webpage,a message will pop up on screen saying "function disabled".If you want to change the message to you own one like "sorry....the work is copyrighted" or something like that,replace the "funtion disabled" text with your own message in the Javascript code.
Read More..

Saturday, June 6, 2009

0 Increase the printing speed of your printer


You can improve the printing speed of your printer with managing the print spooler option. Basically printer spooler holds your prints for some time then send to printer for print out. By default on most printers, printer spooler option is enabled but you turn off to specify that the file should be sending to the printer and not spooled.
Here printer spooler option might be different location in your printer but on most printers you can turn off by going to Start, Setting then Printers. Now right click on the icon of the printer that you are using. Click Properties and select the Advanced tab. Here click on “Print directly to printer” option. This will tie up your application until the printer has all the data, but your print job should finish more quickly. Printing directly to the printer will also come in handy if your print spooler crashes and you need to print before you reboot your PC.


Read More..

0 Protecting Document with Password

You can protect your document by applying password so that unauthorized person can not display as well as modify your document. You can apply two types of passwords:

Password to open the document:

If it is applied then you have to give the correct password to open the document, otherwise you cannot open the document.

Password to modify the document:

If it is applied then you have to give the correct password to modify the document, otherwise your document is opened but you cannot modify the document. It means that your document becomes read-only.

To apply a password to document, follow these steps.

* Open Save As dialog box by selecting "Save As" command from File menu.

* Click "Tools" button of Save As dialog box and choose "General Options" from drop down menu, "Save" dialog box appears as shown in figure below.

* Enter first password in "Password to open" text box and second password in "Password to modify" text box (if required) and click "Ok" button of dialog box. Microsoft Word will open "Confirm Password" dialog box for the confirmation of passwords. The maximum length of password is 15 characters.

* Re-enter the password to open and password to modify and click "Ok" button of Confirm Password dialog boxes one by one.

* Click "Save" button of Save As dialog box.

Read More..

0 Submit Your Blogger/FeedBurner Sitemap to Google Webmaster Tools


Submitting a Sitemap to Google Webmaster Tools provides Google about your site and posts. However I recently found the article "How do I create a Sitemap file?" from Google Webmaster Help Center that You don't need to submit your Sitemap to Google Webmaster Tools if you use a Blogger.


Blogger automatically submits a Sitemap for you


Even though the article says so, I decided to submit my Sitemap to Google becasue I am not 100% sure how it works and it does not cost or hurt me even if I submit it.


Here's how!


1. If you do not have Google Webmaster Tools account, you can register by visiting Google Webmaster Tools.


Google Webmaster Tools


2. If you do not use a redirected custom feed such as FeedBurner, type "atom.xml" and click "Add General Web Sitemap" button.


Add Sitemap


3. If you do use a redirected custome feed such as FeedBurner, type "atom.xml?redirect=false".


Otherwise you will see "URL not allowed" error because the sitemap you have submitted to Google Webmaster Tools is actually redirecting to the FeedBurner feed URL not your site URL. And your Sitemap contains a URL that is not allowed based on the Sitemap's location.


Sitemap with errors and Sitemap without errors


Read More..

0 Top 5 Very Important Security Tests For Your Computer

Until and unless you are not attacked by any virus or spyware you think that your computer security is very high but when your PC gets infected it is too late. So if you think that you have a good Internet security why not you go for some Internet Security Tests :

1) PopUp Blocker Test : This popup test is is an automated way to check your popup blocker's ability to allow good ads.

2) Firewall Test : This test will check your computer for ports that are commonly left open. Open ports could allow your computer to be compromised. This firewall test will also check for open ports known to be used by Viruses and Trojans.

3) Firewall Leak Tester : This website, on one hand, enables you to test your software personal firewall thanks to different test programs ('leaktests'), and on the other hand, shows a global vulnerabilities view of the most common personal firewalls in a summary page.
Firewall Leak Tester provides also documentation and advices to improve your security dramatically.

4) Browser Security Check : This test will check your Browser Security. If you have good browser like Mozilla Firefox you will surely pass this test.

5) Online Port Scan : This test will make a scan of all your Open Ports.

Read More..

0 Prevent Virus Spreading From USB Flash Drives With iKill

My PC usually gets infected with viruses whenever I plugin any of my friends Pen Drive. Here is a simple tool known as iKill which prevents the spreading of viruses from Pen Drive to your PC.

It works by scanning the drives for the presence of removable drives. If found, it parses the autorun.inf file for the executables it may run. If AutoProtect is enabled,it will automatically delete the files present on the drive. Otherwise, it will prompt you for your permission to delete the virus. Version 2 includes unspecified updates.

Download Instructions : Click here to download

Read More..

0 YAHOO ! Tricks

1)>> Change Yahoo messenger title bar. Hey guys you can change the yahoo messenger title bar...
For this just find the foldermessenger in the drive in which the messenger is installed.
Then search a file named"ymsgr". In this file just go to the end and write the following code:
[APP TITLE]CAPTION=Red Devil
Here you can write any name in place of Red Devil... then see the fun.... You can have yourown name being placed in yahoo messenger title bar.


2)>>Remove Yahoo Ads
If you install the newest Yahoo Messenger 7.5 + & Version 8you'll notice a very annoying animated ads at the bottom of the main window.
To remove the Ads! Here is the Procedure!
(1)Open Notepad,
(2) Paste the following code on Notepad and save it as:
somename.reg
Code:
REGEDIT4[HKEY_CURRENT_USER\Software\Yahoo\pager\YUrl]"
N2Phone Adurl"="*""
Messenger Ad"="*""
Address Book"="*""
Change Room Banner"="*""
Conf Adurl"="*""
Chat Adurl"="*""
Tutorials"="*""
Messenger Help"="*""
Voice General Help"="*""
Finance Disclaimer"="*""
Webcam Upload Ad"="*""
Webcam Viewer Ad"="*""
Webcam Viewer Ad Big"="*""
Webcam Viewer Ad Medium"="*""
News Alert Ad URL"="*"


(3)Double click the file ( say: somename.reg )
(4)Click YesIts Done!! No more ads will be there in the yahoo messenger Window!

Read More..

0 Make your own Yahoo Messenger Skins

After learning photoshopping and a little XML and HTML I thought to create something.Then i decided to create Yahoo Messenger Skins and then decided to write a tutorial for you all.

Before starting this tutorial I would like to tell you that you should know little bit about photoshopping.If you dnt know not to worry
open this post to know links to best 100 websites for online photoshooping tutorials.

Now :

  • Goto “%Programfiles%\Yahoo!\Shared\Graphics” folder & there you will see following folders naming ;
  • Indigo
  • Maverick
These are the folders that contain images and xml files that both helps to make Yahoo skin.Now the tricky part comes suppose you want to create a skin naming "Gagan",then make a NEW Folder in Graphics folder naming "GAGAN"

After doing this folow Step2

  • Now copy all the stuff from Maverick folder and paste it in "Gagan" folder that you made in earlier.
After pasting you can edit images and make your own.
Note : The images that you edit should be saved with same size and format.

  • This was about images.We also have to change the text,colour,fonts,font size also. Dnt worry they are much easier.To change fonts size and text you have to edit the XML file..As we have copied all the stuff from Maverick folder then obviously we have to edit maverick.xml file.
To make changes in XML file,right click on it and select edit.For help see screenshot below :


You can edit AuthorNameAuthorURL,Signature etc, anything you like and then click on SAVE
That's it now you are ready with your own skin.

Read More..

0 Kill Yahoo Messenger Ads

Yahoo! Messenger ads are really very annoying and also create delay in opening Yahoo Messenger. Here is a simple software known as Ad Destroy that removes Yahoo Messenger ads. Just run this application and you are done.
How to use this application :

Step 1) Download Ad Destroy 4.0 application from here.

Step 2) Double click on the exe file and you will get a screen shown above. Click on browse and select the folder where Yahoo Messenger is installed. By default it is C:\Program Files\Yahoo!

Step 3) After selecting your folder click on Patch, just wait for 4-5 seconds while the software do its work. Yahoo! Messenger will open automatically, just login to your account and you will not get any ads in future.

This software works fine with the latest version of Yahoo! Messenger.

Note : This software requires Dot Net, if you don't have .Net installed you can install it from here.

More on Yahoo!

Software Created By : http://shadow-corp.net

Read More..

0 Multiple Yahoo Messenger

1. Download yahoo_multiuser.rar file.
2. Extract the file using
WINRAR.
3.Double click on the yahoo_
multiuser.reg file.
4. Window will show a warning saying
are you sure you want to add the registry. Click Yes and then follow step 5
5.
That's it! Now you can use Multi Yahoo Messenger :)

-> How-To Restore Back Yahoo Messenger as a Single user.

1. Download yahoo_singleuser.rar file. (Tip: Right Click on the link and then select “save target as”)
2. Extract the file using
WINRAR.
3.Double click on the yahoo_
singleuser.reg file.
4. Window will show a warning saying
are you sure you want to add the registry. Click Yes and then follow step 5
5.
That's it! Now you can use Yahoo Messenger as Single User.

Read More..

0 How to remove Windows 7 Beta ‘Send Feedback’ link and wallpaper watermark

The new Windows 7 beta release just like Vista preview releases before it incorporate some additional UI elements meant for testers to submit feedback back to Microsoft.
Now considering you may be running this Beta 1 release as your main OS for some reason (I admit it, I have given in to the temptation many times before), one of those elements in particular can become annoying and obtrusive to your otherwise neat configured desktop.

Here’s how to remove the Send Feedback link:

(1) Run the Registry Editor (type regedit on the start run menu)
(2) Browse to the following registry key: HKEY_CURRENT_USER\Control Panel\Desktop
(3) If it’s not already there, add a new DWORD (32-bit) value “FeedbackToolEnabled” and set its data field to 0.
(4) The change should take effect on your next restart.

An alternative way to do this is and to remove wallpaper watermark from the beta.
The process for doing this is i recommend you do is
download this utility that will take care of everything for you -
notice however this is only meant to work with Windows 7 Build 7000 (Beta 1).

Read More..

0 Test Windows Vista Online

If you have not installed Windows Vista till now and want to experience it in
your own PC here is a simple method. Yes, you can test
Windows Vista in your PC without installing it.

To test Windows Vista visit this site.


Share/Bookmark
Read More..

0 How To Make Your Own Desktop

There are many user who keeps on writing to me about How to customize desktop !

How to give a makeover to your desktop :

Here is a list of top 3 applications that will give a new and sexy look to your desktop

  1. Window Blinds
  2. Rainmeter
  3. Object Dock Plus
Window Blinds :

About The Software : WindowBlinds is a one-of-a-kind utility that allows Windows users to completely change the look and feel of the Windows interface by applying a new skin.
To know more about this product visit
this website

Download Instructions : You can download the full version from http://katz.cd/
Additional Skins : To get cool skins of Window Blinds visit http://customize.org/windowblinds

Rainmeter :

About The Software : Rainmeter is a customizable performance meter, which can display the CPU load, memory utilization, disk space, network traffic, time and many more things.

Here are some key features of "
Rainmeter

  • Freeform skins
  • Supports Windows transparency
  • Plugin system for 3rd party support
  • Anti-aliased drawing routines
  • Works also as Litestep plugin
  • Has ability to hide on mouse over
  • Can stick to the desktop (i.e. doesn't hide with Show Desktop)
  • Skins can react to mouse events
  • Multiple skins can be ran at the same time
  • Can be controlled from 3rd party applications with !bangs
Download Instructions : It is a freeware application and you can download Rainmeter from here.

Additional Skins : You can also download Rainmeter skins from here.

Object Dock Plus:

About The Software : ObjectDock™ is a program that enables users to organize their shortcuts, programs and running tasks into an attractive and fun animated Dock. By allowing users to have more control over how they organize their desktop, users can take control of their desktop icons and shortcuts to have them be available when where and how they need them. This, all with the unique style and top-rate performance that ObjectDock is known to deliver!

Read More..

0 How To Change Windows XP Shutdown Dialog Box

Here I am going to tell you that how to customize the default Shutdown Dialog Box in Windows XP.

Lets Start :

Requirements :

1) Resource Hacker
2) Windows XP Installed on your system
3) Images you want to replace


Before starting I would like to tell you that this tutorial needs some basic knowledge about
Resource Hacker. Click here to read the post on Resou
rce Hacker.

First
download these images that you have to replace with default images.

We have to edit 2 dll files here :

1) Shell32.dll
2) Msgina.dll


Editing Shell32.dll
:
Now open Resource Hacker and press
Ctrl+O and navigate to C drive >> System32 >> shell32.dll and click on Open.

Navigate to
Bitmap >> 14351 >> 1033 and replace this image with gagan1.bmp
Navigate to
Bitmap > 14353 >> 1033 and replace this image with gagan2.bmp
Navigate to
Bitmap >> 14354 >> 1033 and replace this image with gagan1.bmp
Navigate to
Bitmap >> 14355 >> 1033 and replace this image with gagan2.bmp
Navigate to
Bitmap >> 14356 >> 1033 and replace this image with gagan3.bmp

Now
save your file.

Editing Msgine.dll :

Again press
Ctrl+O and navigate to C drive >> System32 >> msgina.dll and click on Open.

Navigate to Bitmap >> 20140 >> 1033 and replace this image with gagan1.bmp
Navigate to
Bitmap > 20141 >> 1033 and replace this image with gagan2.bmp
Navigate to
Bitmap >> 20142 >> 1033 and replace this image with gagan1.bmp
Navigate to
Bitmap >> 20143 >> 1033 and replace this image with gagan2.bmp
Navigate to
Bitmap >> 20100 >> 1033 and replace this image with gagan4.bmp

Now
save your file.

Read More..

0 How To Increase The Size Of C Drive in Windows XP

When ever you install any program, by default it gets installed in your C drive thus reducing the size of C drive. And when it is filled users start getting annoying balloon messages at the taskbar saying Memory is too low....

So to overcome this problem
here is the solution to it :

>> Go to your
D or E drive and create a New Folder and name it Gagan.

>> Now press Windows+R and typediskmgmt.msc and hit Enter.

>> A new Window will pop up named
Disk Management.


>>
Right click on (C:) and select Change Drive Letters a
nd Paths.

>> Now click on Add and browse to the Gagan folder created in first step and click OK


Thats it !! Now size of the C: drive is increased and in future you will not get any message about low disk space.

Read More..

0 All Drives Icons Missed?

To fix all the drive icons ,do the following steps :

  • First get any .ico files that you want to display as your drive icons.Say that icon file is gagan.ico and put in it in C:\WINDOWS\Icons.
  • Then open Start and click on RUN.
  • Type regedit in it and press Enter.
  • Registry Editor will open.
  • OpenHKEY_LOCAL_MACHINE>>Software>>Microsoft>>Windows>>CurrentVersion>>Explorer>>DriveIcons
And under DriveIcons you will see names of your drives example C,D,E...

Suppose if your
D drive icon is gone just go to DriveIcons and double click on it.

In the right hand side panel, right click on default and select modify and put in the path of your drive icon.
For example :

C:\WINDOWS\Icons\gagan.ico

Download My Drive Icons
: Click here to download.


Read More..
Related Posts with Thumbnails